Have you ever wanted to make your classroom or study group feel like a high-energy game show? If so, you are in the right place! Learning how to host Blooket is one of the best ways to get everyone excited about education. Blooket is an amazing online platform that turns boring quizzes into competitive games. Whether you are a teacher looking to engage your students or a student wanting to challenge your friends, this guide will show you everything you need to know. It is very simple to get started, and once you know the steps, you will be able to start a match in just a few clicks. Let’s dive into the fun world of Blooket and see how it works!
What Exactly Does It Mean to Host Blooket?
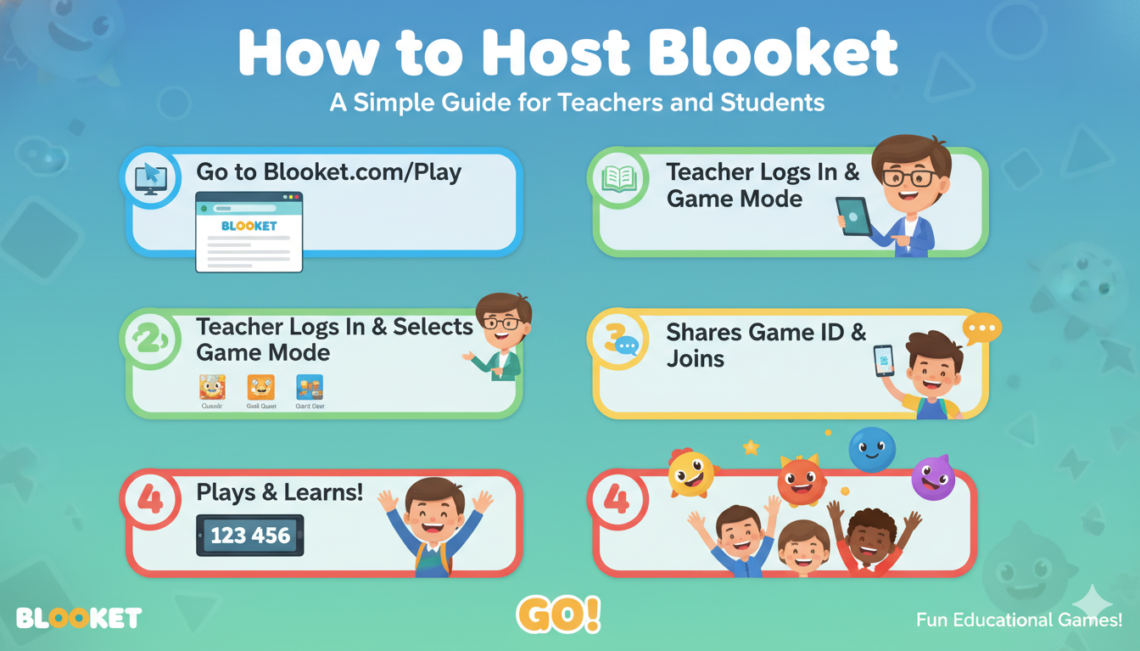
Before we start, let’s talk about what it actually means to host Blooket. When you are the host, you are the leader of the game. You choose which set of questions everyone will answer and which game mode you will play together. You will also get a special code to share with your players so they can join your room. Being the host gives you the power to start the game, end it, and see how well everyone is doing in real-time. It is a very helpful tool for seeing who understands the lesson and who might need a little more help. Plus, it is just plain fun to see the leaderboard change as people answer correctly!
Step 1: Create or Find a Great Question Set
The first thing you need to do to host Blooket is pick your questions. You can create your own set of questions if you have something specific to teach. However, if you are in a rush, you can browse the “Discover” page to find thousands of sets made by other people. There are sets for math, science, history, and even fun trivia about movies or sports. Once you find a set you like, just click on it. You will see a big “Host” button on the left side of the screen. Clicking this button is the first step to bringing your game to life for your audience.
Step 2: Choose the Perfect Game Mode for Your Group
Blooket is famous because it has so many different game modes. When you host Blooket, you have to decide which style of play fits your group best. Some modes, like “Gold Quest,” are fast and a bit lucky. Other modes, like “Tower Defense,” require more strategy and thinking. If you want something calm, you might pick “Cafe.” If you want pure chaos and excitement, “Battle Royale” is a great choice. Each mode has its own rules, but they all use the same question set you picked earlier. This variety keeps the kids from getting bored, even if they are practicing the same topic every day.
Step 3: Customizing Your Game Settings
After you pick a mode, you will see a screen with different settings. This part is important when you host Blooket because it lets you control the pace. You can decide if the game ends after a certain amount of time or when someone reaches a specific goal. You can also choose to allow late joiners, which is great if a student’s internet is acting a bit slow. I always recommend keeping the “Random Names” setting off unless you want to give everyone a funny nickname automatically. Taking a minute to look at these settings ensures that your game runs smoothly and everyone has a fair chance to win.
Step 4: Sharing the Join Code with Your Players
Now comes the exciting part! Once you click “Host Now,” a big ID code will appear on your screen. To host Blooket successfully, you need to show this code to your players. They will go to the Blooket website and click “Join a Game.” They type in your code and then pick a “Blook,” which is a cute little animal character. As people join, you will see their names pop up on your screen. It is always fun to see which characters the students pick. Once everyone is in the lobby and ready to go, you can finally hit that “Start” button to begin the action.
Step 5: Managing the Game While It Is Running
While the game is going, your job as the host is to keep an eye on things. When you host Blooket, your screen shows a live leaderboard. You can see who is in first place and how many questions the group is getting right overall. If you notice that many people are missing the same question, you can use that as a “teaching moment” later. You also have the power to remove a player if they are using an inappropriate name or being disruptive. Most of the time, though, you will just be enjoying the cheers and groans from the players as they win or lose points!
Why Teachers Love to Host Blooket in Class
Teachers everywhere are finding that they love to host Blooket because it makes kids want to learn. Sometimes it is hard to get students to focus on math facts or vocabulary words. But when you put those same words into a game where they can collect coins or build towers, they suddenly become very interested! It turns a quiet classroom into a place of active learning. Because it is digital, it also saves paper and gives the teacher instant data on how the class is doing. It is a “win-win” situation for both the educator and the excited students in the room.
Tips for a Smooth Hosting Experience
If you want to host Blooket like a pro, there are a few tips to keep in mind. First, make sure your internet connection is stable so the game doesn’t lag. Second, try playing the game yourself a few times so you understand the rules of each mode. This way, you can explain them to your players if they get confused. Third, keep the volume at a good level. The music in Blooket is very catchy, but it can get loud if you have thirty people playing at once! Following these simple tips will make sure your game session is a huge success every single time.
Comparing Blooket to Other Learning Games
You might have heard of other games like Kahoot or Quizizz. While those are great, many people prefer to host Blooket because of the “gameplay” element. In other apps, you mostly just answer questions and see a bar chart. In Blooket, the questions are just the “key” to playing a much bigger game. You might be stealing gold from a friend or feeding a virtual pet. This extra layer of fun makes Blooket feel more like a real video game. It is this unique mix of gaming and studying that really sets it apart from the rest of the pack.
Detailed Blooket Hosting Overview Table
Conclusion: Start Your First Game Today!
Now that you know how to host Blooket, there is nothing stopping you from having an amazing time. It is a powerful tool that brings joy back into the learning process. By following the steps in this guide, you can set up a game in less than five minutes. Your students or friends will thank you for making the day more interesting. So, go ahead and log in, find a cool question set, and hit that host button! You will be amazed at how much fun everyone has while they are actually learning something new. Happy gaming!
Frequently Asked Questions (FAQs)
1. Is it free to host Blooket? Yes! You can host Blooket for free with up to 60 players. There is a paid version called Blooket Plus that allows for more players and extra features, but the free version is great for most classrooms.
2. Can students host Blooket games too? Absolutely! Anyone with an account can host Blooket. Students often host games for their friends during lunch or after school to study together in a fun way.
3. Do players need an account to join my game? No, players do not need an account to join when you host Blooket. They just need the join code and the website link. However, having an account lets them save their “Blooks” and progress.
4. What happens if I accidentally close my browser? If you are the one to host Blooket and your browser closes, the game will usually end for everyone. It is important to keep your window open until the game is completely finished.
5. Can I host Blooket for homework? Yes! There is a “HW” (Homework) option for many game modes. Instead of hosting a live game, you can set a deadline, and students can play the game at their own pace at home.